- Published on
java经典框架-springboot
- Authors

- Name
- MissTree
安装与配置
官网下载安装(推荐)
spring 官网点击项目 Spring Boot页面下方 Quickstart Your Project 点击 Spring Initializr进入自定义项目页面,选择最新版的安装包,加载web依赖包最后点击下载 GENERATE CTRL+,解压导入IDEA后即可使用。 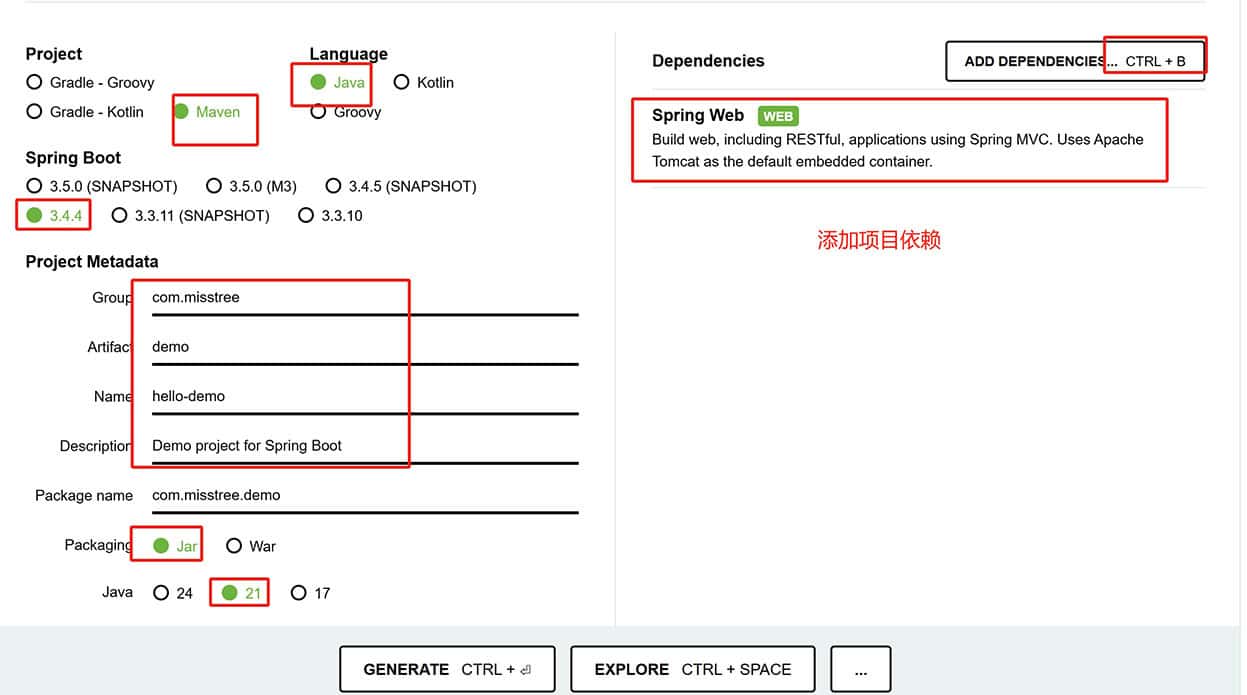
IDEA安装项目
IDEA下载:版本选择 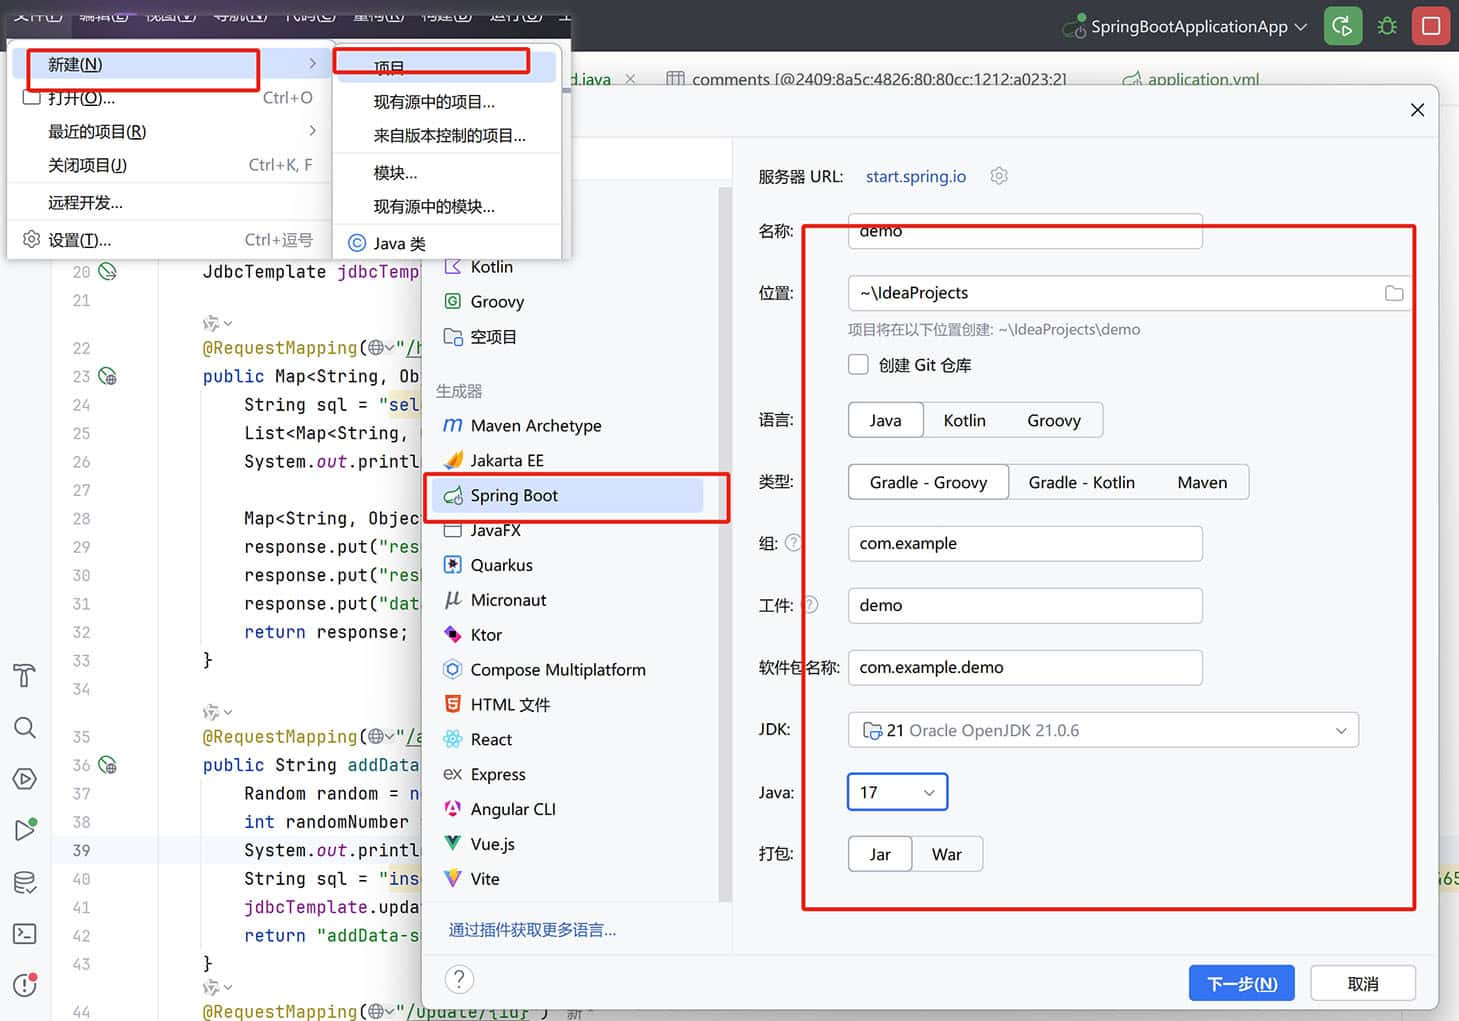 流程和官网上基本一致
- 点击
File->New->Project->Maven Archetype(2023以后社区新版本不再支持Spring Initializr方式安装)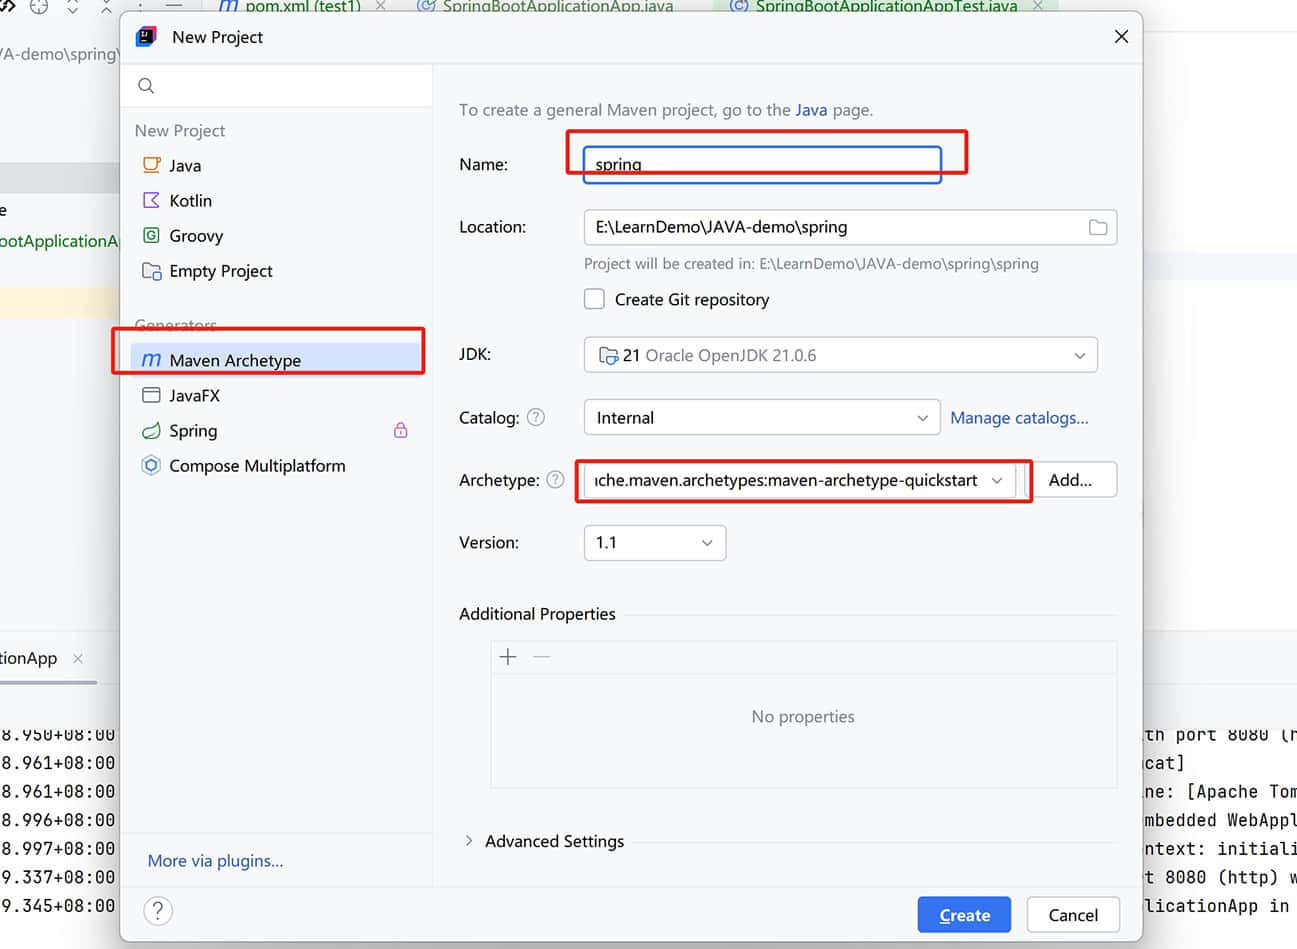 在生成的项目中,
pom.xml中添加以下依赖:
<!-- 下面的版本号按实际情况而定 -->
<project xmlns="http://maven.apache.org/POM/4.0.0" xmlns:xsi="http://www.w3.org/2001/XMLSchema-instance"
  xsi:schemaLocation="http://maven.apache.org/POM/4.0.0 http://maven.apache.org/xsd/maven-4.0.0.xsd">
 <modelVersion>4.0.0</modelVersion>

 <parent>
  <groupId>org.springframework.boot</groupId>
  <artifactId>spring-boot-starter-parent</artifactId>
  <version>3.x.x</version>
 </parent>

 <groupId>org.example</groupId>
...

 <dependencies>
  <dependency>
   <groupId>org.springframework.boot</groupId>
   <artifactId>spring-boot-starter-web</artifactId>
   <version>3.x.x</version>
  </dependency>
  ....
 </dependencies>
</project>
maven 依赖搜索地址:Maven Repository
修改完后在
pom.xml编辑区域右上角点击重新加载即可。
- 更新
src/main/java/<项目名称>/目录下的<项目名称>Application.java文件,添加@SpringBootApplication注解:
package com.misstree.demo;

import org.springframework.boot.SpringApplication;
import org.springframework.boot.autoconfigure.SpringBootApplication;

@SpringBootApplication
public class HelloDemoApplication {

	public static void main(String[] args) {
  // 默认两个参数,第一个是启动类,第二个是启动参数
		SpringApplication.run(HelloDemoApplication.class, args);
	}
}
当前文件为启动类,SpringBootApplication 本质是一个springboot的组件
- 在
src/main/创建resource文件夹创建一个名为application.properties的配置文件
简单测试接口
在src/main/java/<项目名称>/创建目录 controller 后新建一个简单的控制器类,用于处理 HTTP 请求:
package com.misstree.demo;

import org.springframework.web.bind.annotation.RequestMapping;
import org.springframework.web.bind.annotation.RestController;

@RestController
public class helloworld {
  // 定义一个名为hello的公共类
  @RequestMapping("/hello")
  public String hello() {
    return "Hello World! 这是一个接口";
  }
}

配置文件
Spring Boot 最新配置(Spring Boot 2.x配置) 支持多种配置文件格式,包括:
application.properties:使用键值对的方式配置应用程序的属性。application.yml:使用 YAML 格式的配置文件。 spring 的配置大多遵循约定大于配置的原则,配置存放位置有四种,默认我们只需要在src/main/resource目录下创建一个名为application.properties的配置文件即可。
<!-- 配置文件存放位置优先级 -->
├── config:存放应用的配置文件
|   ├── application.yml:配置文件优先级最高
├── src:项目文件
|   ├── main:
|   |   ├── java:存放java源代码
|   |   └── resource::配置文件
|   |       ├── config:存放应用的配置文件
|   |       |   └──  application.yml:配置文件优先级最低
|   |       └── application.yml:配置文件优先级第三高(默认约定存放位置)
|   └── test
└──  application.yml:配置文件优先级第二高
不仅支持在文件通过
${random.uuid}方式变量设置,还可以设置配置的变量实现不同环境的切换,例如:application-dev.properties、application-prod.properties,在启动时通过--spring.profiles.active=dev指定使用哪个配置文件。
# application.properties  设置环境base
spring.profiles.active=dev

# application-dev.properties
server.port=8081
# application-prod.properties
server.port=8082

# 若是用.yml文件则可以统一写到一个文件内
spring:
  profiles:
    active: dev
    group:application-dev,
application:
  name: demo
  port: ${server.port}
---
spring:
----------
spring:
  profiles:
    active: test
    group:application-test,application-server,application-client
application:
  name: demo
----------
spring:
  profiles:
    active: prod
    group:application-prod
application:
  name: demo
还可以对不同环境的文件进行分组,例如:
application-dev.yml、application-prod.yml,在启动时通过--spring.profiles.active=dev指定使用哪个配置文件。
# 配置端口号
server.port=8088
# 配置项目名称
spring.application.name=demo
# 配置数据库连接信息
spring.datasource.url=jdbc:mysql://localhost:3306/demo?useUnicode=true&characterEncoding=utf-8&useSSL=false&serverTimezone=Asia/Shanghai
spring.datasource.username=root

# 自定义其他配置  在项目中可以直接引入
demo.name=demo
demo.age=18
demo.hobby=["打球","学习动作片"]
在其他类中可以通过
@Value注解来获取配置文件中的值
获取配置文件值
Spring Boot 提供了 @Value 和 @ConfigurationProperties 注解,可以将配置文件中的属性映射到 Java 对象中。Value注解支持单个值的绑定,ConfigurationProperties支持松散方式绑定,例如 demo.name 可以映射到 demoName,不需要单个绑定值。
@Value("${demo.name}")
private String name;

@Configuration
@ConfigurationProperties(prefix = "demo")
public class DemoProperties {
  private String name;
  private int age;
  private List<String> hobby;
}
PropertySource
如果需要从其他位置加载配置文件,可以使用 @PropertySource 注解。例如,从 classpath:config/application.properties 加载配置文件:
@Configuration
// classpath:指定配置文件位置 默认是resource目录下的配置文件
@PropertySource("classpath:application.properties")
public class DemoProperties {
  @Value("${demo.name}")
  private String name;
}

# 加载多个文件
@Configuration
@PropertySource({"classpath:application.properties","classpath:config/application.properties"})
public class DemoProperties {
  @Value("${demo.name}")
  private String name;
}

#  动态加载(基于 Profile)
@Configuration
@PropertySource("classpath:config-${spring.profiles.active}.properties")
public class AppConfig {
  // ...
}

# 从外部文件加载(非 classpath)
@Configuration
@PropertySource("file:/path/to/external/config.properties")
public class AppConfig {
  // ...
}

# 与 @ConfigurationProperties 结合
@Configuration
@PropertySource("classpath:app.properties")
@ConfigurationProperties(prefix = "app")
public class AppProperties {
   private String name;
   private String version;
}
默认情况下,@PropertySource 不支持 YAML 文件,但可以通过自定义 PropertySourceFactory 实现对 YAML 文件的支持。
@Configuration
@PropertySource(value = "classpath:config.yml", factory = YamlPropertySourceFactory.class)
public class AppConfig {
    // ...
}

import org.springframework.boot.env.YamlPropertySourceLoader;
import org.springframework.core.env.PropertySource;
import org.springframework.core.io.support.EncodedResource;
import org.springframework.core.io.support.PropertySourceFactory;

import java.io.IOException;

public class YamlPropertySourceFactory implements PropertySourceFactory {
  @Override
  public PropertySource<?> createPropertySource(String name, EncodedResource resource) throws IOException {
    return new YamlPropertySourceLoader().load(resource.getResource()
    .getFilename(), resource.getResource()).get(0);
  }
}
配置文件加载顺序
Spring Boot 会按照以下顺序加载配置文件:
file:./config/:当前项目下的config目录。file:./:当前项目根目录。classpath:/config/:classpath 下的config目录。classpath:/:classpath 根目录。
常用注解
@SpringBootApplication
Spring Boot 的核心注解,用于标识一个 Spring Boot 应用程序的入口类。它是一个组合注解,包含了 @Configuration、@EnableAutoConfiguration 和 @ComponentScan 三个注解。
- @Configuration:用于标识一个类为配置类,可以在这个类中定义 Bean。
- @Component:用于标识一个类为 Spring 组件,可以被 Spring 容器管理。
- @Controller:用于标识一个类为 Spring MVC 控制器,可以在这个类中定义请求处理方法。
- @RestController:是 @Controller 和 @ResponseBody 的组合注解,返回的对象会自动转换为 JSON 或 XML 等格式的数据返回给客户端。
- @RequestMapping: @RequestMapping(value = "/example", method = RequestMethod.GET)用于映射请求路径,可以指定请求方法、请求参数、请求头等。
- @GetMapping:用于映射 GET 请求。
- @PostMapping:用于映射 POST 请求。
- @PutMapping:用于映射 PUT 请求。
- @DeleteMapping:用于映射 DELETE 请求。
- @PatchMapping:用于映射 PATCH 请求。
- @ComponentScan:用于指定 Spring Boot 应该扫描哪些包以查找 Bean,Spring Boot默认是扫描@SpringBootApplication所在启动类的文件夹以及子文件夹,相邻或者父文件夹以及以上的兄弟文件夹夹注册的Bean是扫描不到的。
- @ComponentScan(basePackages = "com.example.demo"):指定扫描的包路径。
- @Service:用于标识一个类为服务层组件,通常用于处理业务逻辑。Spring 会自动扫描并将其注册为 Bean。
- @Repository:用于标识一个类为数据访问层组件,通常用于与数据库交互。Spring 会自动扫描并将其注册为 Bean,同时还会对该类中抛出的数据访问异常进行转换。
- @Value: 用于从配置文件(如 application.properties 或 application.yml)中读取属性值并注入到字段中。
- @Autowired: 用于自动装配 Bean。Spring 会根据类型在容器中查找匹配的 Bean 并注入到使用该注解的字段、构造方法或 setter 方法中。
- @Qualifier: 当存在多个相同类型的 Bean 时,@Autowired 无法确定要注入哪个 Bean,此时可以使用 @Qualifier 注解指定要注入的 Bean 的名称。
- @EnableAutoConfiguration:用于自动配置 Spring Boot 应用程序,根据类路径中的 jar 依赖自动配置 Spring 应用程序。
- @Validated:用于标识一个类需要进行验证,可以在这个类中定义验证规则。
- @Aspect: 用于标识一个类为切面类,该类中可以定义切点和通知。
Bean注册
Spring Boot 提供了多种方式来注册 Bean,包括:
- @Bean:用于在配置类中定义一个 Bean 注册到容器中,可以指定 Bean 的名称、作用域、初始化方法、销毁方法等。
静态资源
默认配置
Spring Boot 提供了默认的静态资源路径,这些路径下的文件可以直接通过 URL 访问。默认的静态资源路径包括:
classpath:/static/classpath:/public/classpath:/resources/classpath:/META-INF/resources/
自定义配置
可以通过在 application.properties 或 application.yml 文件中添加以下配置来自定义静态资源路径:
# 设置静态资源路径
spring.resources.static-locations=classpath:/static/,classpath:/public/
spring:
  profiles:
    active: dev
  resources:
    static-locations: classpath:/static/,classpath:/public/
设置静态资源的加载
在 webapp 应用中可以通过 webjars 官网 查找需要的静态资源,通过maven的方式复制代码到 pom.xml 文件中加载依赖。例如 jQuery,可以通过下列方式加载。
# 在 pom.xml 文件中 dependencies 添加以下依赖:
<dependency>
    <groupId>org.webjars</groupId>
    <artifactId>jquery</artifactId>
    <version>3.5.0</version>
</dependency>
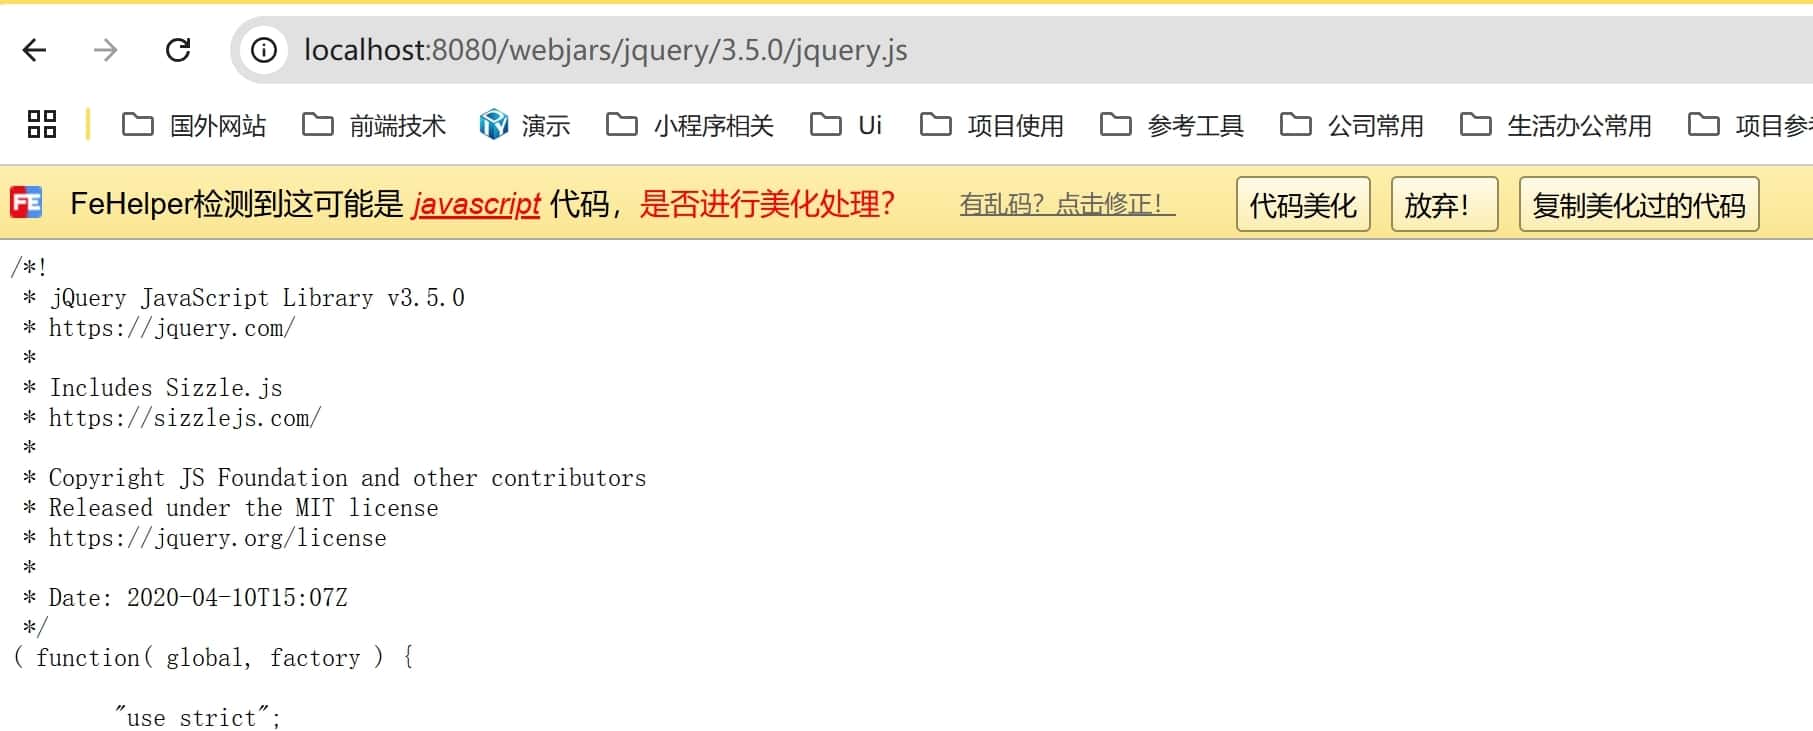
通过 localhost:8080/webjars/jquery/3.5.0/jquery.js 访问静态资源
还可以通过下面方式加载静态资源 前提是不另外在配置里另外设置静态资源文件夹,访问方式为 localhost:8080/jquery-3.5.0.js
- resources:/src/main/resources/ 配置文件目录
- resources:放置静态资源
权限最高 - static:默认静态资源配置文件夹
权限第二 - public:公共资源配置文件夹
- META-INF/resources:默认静态资源配置文件夹
- resources:放置静态资源
可以通过 WebMvcAutoConfiguration 类查看默认配置 addResourceHandlers 方法
设置首页 在 src/main/resources/static 目录下创建一个名为 index.html 的文件,然后在浏览器中访问 localhost:8080 即可看到首页内容。 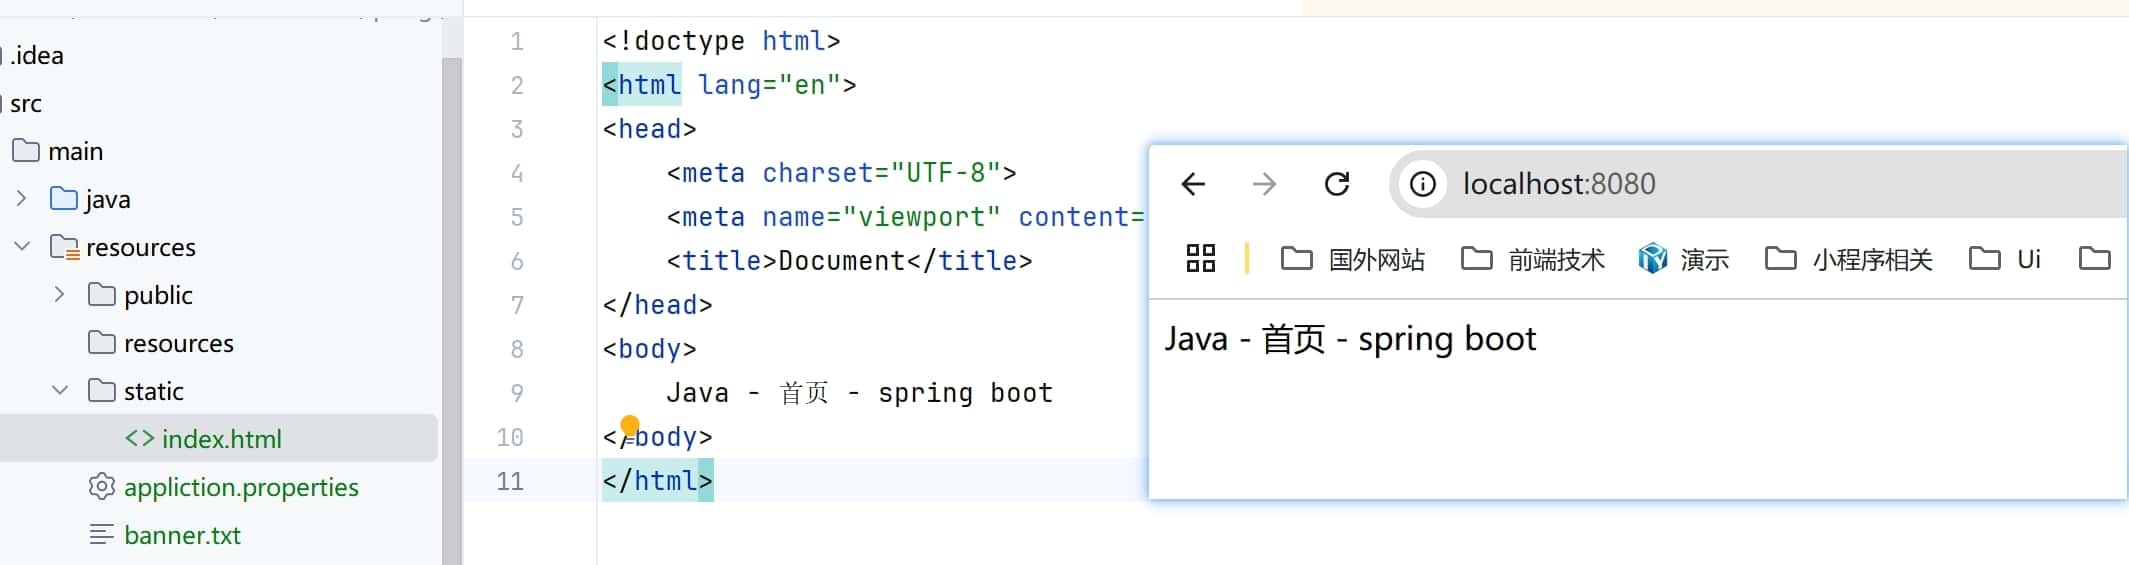
模板引擎
Spring Boot 支持多种模板引擎,包括 Thymeleaf、Freemarker、Mustache 等。默认情况下,Spring Boot 会自动配置 Thymeleaf 模板引擎。
- 在 pom.xml 文件中添加 Thymeleaf 依赖:
<dependencies> <!-- Thymeleaf 核心依赖 --> <dependency> <groupId>org.springframework.boot</groupId> <artifactId>spring-boot-starter-thymeleaf</artifactId> </dependency> <!-- 如果需要 Thymeleaf 对 Spring Security 的支持(可选) --> <dependency> <groupId>org.thymeleaf.extras</groupId> <artifactId>thymeleaf-extras-springsecurity6</artifactId> </dependency> </dependencies> - 在
src/main/resources/templates目录下创建一个模板文件。<!DOCTYPE html> <html xmlns:th="http://www.thymeleaf.org"> <head> <meta charset="UTF-8"> <title>Hello Thymeleaf</title> </head> <body> <h1 th:text="${message}"></h1> </body> </html> - 在控制器中返回模板文件名即可。
@Controller
public class HelloController {
  @GetMapping("/template")
  public String hello(Model model) {
    // 设置模板变量
    model.addAttribute("message", "Hello, Thymeleaf!");
    return "hello"; // 对应 templates/hello.html
  }
}
相关代码参考 ThymeleafProperties 类,模板html的内部变量设置请查看 Thymeleaf 文档和相关版本。
在前后端分离的项目中,一般不会使用模板引擎,而是使用前后端分离的方式,通过 Ajax 请求获取数据,然后在前端页面中展示数据。
数据库连接
当前流行的方式是使用 mybatis + springboot + mysql
更新 Pom.xml 文件,添加数据库连接依赖:MySQL Driver 驱动和 Spring Data JDBC 依赖。
<dependencies>
    <!-- MySQL Driver -->
    <dependency>
        <groupId>mysql</groupId>
        <artifactId>mysql-connector-java</artifactId>
        <version>8.0.26</version>
    </dependency>

    <!-- Spring Data JDBC -->
    <dependency>
        <groupId>org.springframework.boot</groupId>
        <artifactId>spring-boot-starter-data-jdbc</artifactId>
    </dependency>
</dependencies>
在 application.yml 文件中添加数据库连接配置。
server
  port: 8088
spring
  datasource:
    // 若是出现时区配置错误 可以添加 serverTimezone=UTC
    url: jdbc:mysql://localhost:3306/demo?useUnicode=true&characterEncoding=utf-8&useSSL=false&serverTimezone=Asia/Shanghai
    username: root
    password: root
    driver-class-name: com.mysql.cj.jdbc.Driver
  jpa:
    hibernate:
配置数据库连接
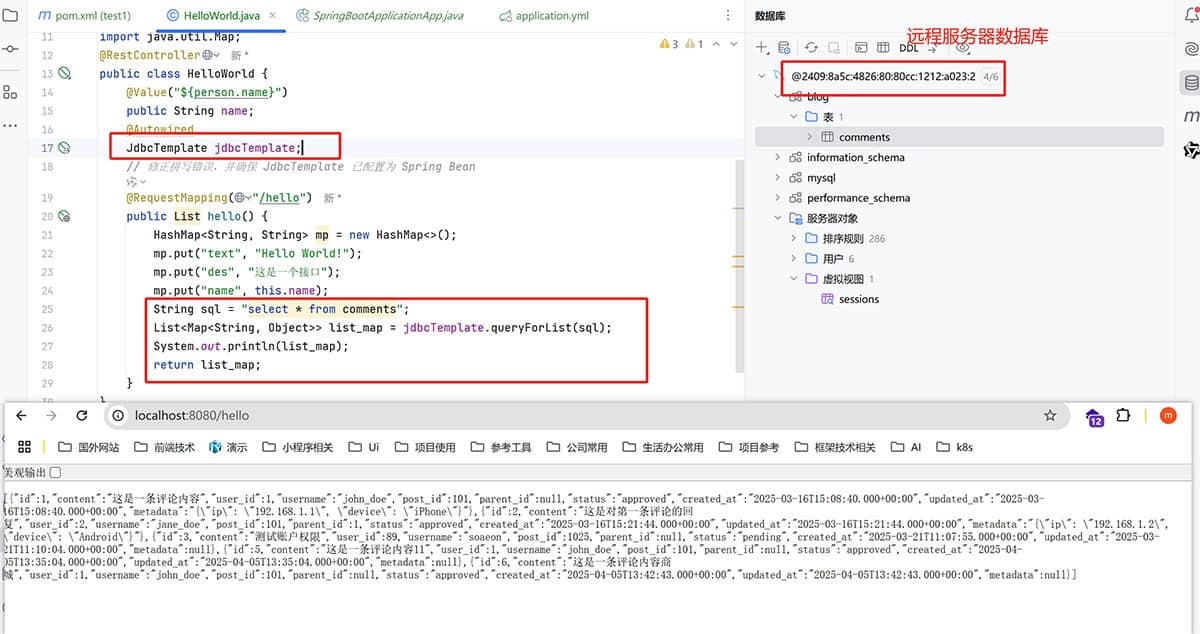
编辑一个连接数据库的类,例如 DataSourceConfig :
package org.example.controller;

import org.springframework.beans.factory.annotation.Autowired;
import org.springframework.web.bind.annotation.RequestMapping;
import org.springframework.web.bind.annotation.RestController;
import org.springframework.jdbc.core.JdbcTemplate;

import java.util.HashMap;
import java.util.List;
import java.util.Map;
@RestController
public class HelloWorld {
    @Autowired
    JdbcTemplate jdbcTemplate;
    @RequestMapping("/hello")
    public List hello() {
        String sql = "select * from comments";
        List<Map<String, Object>> list_map = jdbcTemplate.queryForList(sql);
        System.out.println(list_map);
        return list_map;
    }
}
操作数据库服务
package org.example.controller;

import org.springframework.beans.factory.annotation.Autowired;
import org.springframework.web.bind.annotation.RequestMapping;
import org.springframework.web.bind.annotation.RestController;
import org.springframework.jdbc.core.JdbcTemplate;
import org.springframework.web.bind.annotation.PathVariable;

import java.util.HashMap;
import java.util.List;
import java.util.Map;
@RestController
public class HelloWorld {
  @Autowired
  JdbcTemplate jdbcTemplate;

  @RequestMapping("/search")
  public List search() {
    String sql = "select * from comments";
    List<Map<String, Object>> list_map = jdbcTemplate.queryForList(sql);
    System.out.println(list_map);
    Map<String, Object> response = new HashMap<>();
    response.put("resCode", 200);
    response.put("resMsg", "success");
    response.put("data", list_map);
    return response;
  }

  @RequestMapping("/add")
  public String add() {
    String sql = "insert into blog.comments (id, name, content) values (1, '张三', '这是一条评论')";
    jdbcTemplate.update(sql);
    return "success";
  }

  @RequestMapping("/delete/{id}")
  public String delete(@PathVariable("id") int id) {
      String sql = "delete from comments where  id ="+id;
      jdbcTemplate.update(sql);
      return "success";
  }

  @RequestMapping("/update/{id}")
  public String update(@PathVariable("id") int id ) {
    String sql = "update blog.comments set username = '李四-2366id' where id ="+id;
    jdbcTemplate.update(sql);
    return "success";
  }
}
整合 MyBatis
MyBatis 是一个优秀的持久层框架,它支持自定义 SQL、存储过程以及高级映射。在 Spring Boot 中,我们可以使用 MyBatis 来操作数据库。
1. 添加 MyBatis 依赖
在 pom.xml 文件中添加 MyBatis 依赖:
		<!-- JDBC -->
		<dependency>
			<groupId>org.springframework.boot</groupId>
			<artifactId>spring-boot-starter-jdbc</artifactId>
			<version>3.4.4</version>
		</dependency>
		<!--  MYSQL  -->
		<dependency>
			<groupId>mysql</groupId>
			<artifactId>mysql-connector-java</artifactId>
			<version>8.0.26</version>
		</dependency>
    <!-- mybatis -->
    <dependency>
        <groupId>org.mybatis.spring.boot</groupId>
        <artifactId>mybatis-spring-boot-starter</artifactId>
        <version>2.1.4</version>
    </dependency>
2. 配置 MyBatis
mybatis:
  # 静态资源 映射文件
  mapper-locations: classpath:mapper/*.xml
  # 实体类 包扫描位置不能错,
  type-aliases-package: com.example.demo.entity
3. 创建实体类
创建一个实体类,例如 User :
package com.example.demo.entity;

@Data
@AllArgsConstructor
@NoArgsConstructor
public class Comments {
    private int id;
    private String name;
    private String content;
    private String time;
    ...
}
4. 创建 Mapper 接口
创建一个 Mapper 接口,例如 UserMapper :
package com.example.demo.mapper;
@Mapper
@Repository
public interface CommentsMaper {
    List<Comments> getComments();
    int addComments(Comments comments);
    int delComments(int id);
    int updateComments(Comments comments);
}
5. 创建 Mapper XML 文件
创建一个 Mapper XML 文件,例如 UserMapper.xml :
<?xml version="1.0" encoding="UTF-8" ?>
<!DOCTYPE mapper
        PUBLIC "-//mybatis.org//DTD Mapper 3.0//EN"
        "https://mybatis.org/dtd/mybatis-3-mapper.dtd">
<mapper namespace="com.misstree.demo.mapper.CommentsMaper">
    <select id="getComments" resultType="Comments">
        select * from comments
    </select>

    <insert id="addComments" parameterType="Comments">
        insert into comments(id,name,content) values(#{id},#{name},#{content})
    </insert>

    <delete id="delComments" parameterType="Comments">
        delete from comments where id = #{id}
    </delete>

    <update id="updateComments" parameterType="Comments">
        update comments set name = #{name},content = #{content} where id = #{id}
    </update>
</mapper>
6. 在 Service 中使用 Mapper
在 Service 中注入 Mapper,并使用它来操作数据库:
@Data
@AllArgsConstructor
@NoArgsConstructor
@RestController
public class CommentsController {
    @Autowired
    private CommentsMaper commentsMaper;

    @GetMapping("/getComments")
    public List<Comments> getComments(){
        return commentsMaper.getComments();
    }
    @RequestMapping("/addComments")
    public int addComments(Comments comments){
        return commentsMaper.addComments(comments);
    }
    @RequestMapping("/delComments/{id}")
    public int delComments(@PathVariable int id){
        return commentsMaper.delComments(id);
    }
    @RequestMapping("/updateComments")
    public int updateComments(Comments comments){
        return commentsMaper.updateComments(comments);
    }
}
注意:在 Mapper 接口中,每个方法都需要对应一个 SQL 语句,SQL 语句可以在 Mapper XML 文件中定义。application.yml 中配置了 mapper-locations 和 type-aliases-package,这样 MyBatis 就可以自动扫描到这些配置,并自动映射实体类和 SQL 语句。
数据库连接池
HikariCP
HikariCP Spring Boot 2.x默认连接池,性能极高
特点:轻量级,代码精简,启动速度快,并发性能好
spring:
  datasource:
    hikari:
      maximum-pool-size: 20
      minimum-idle: 10
      idle-timeout: 30000
      max-lifetime: 1800000
      connection-timeout: 30000
Druid(阿里巴巴)
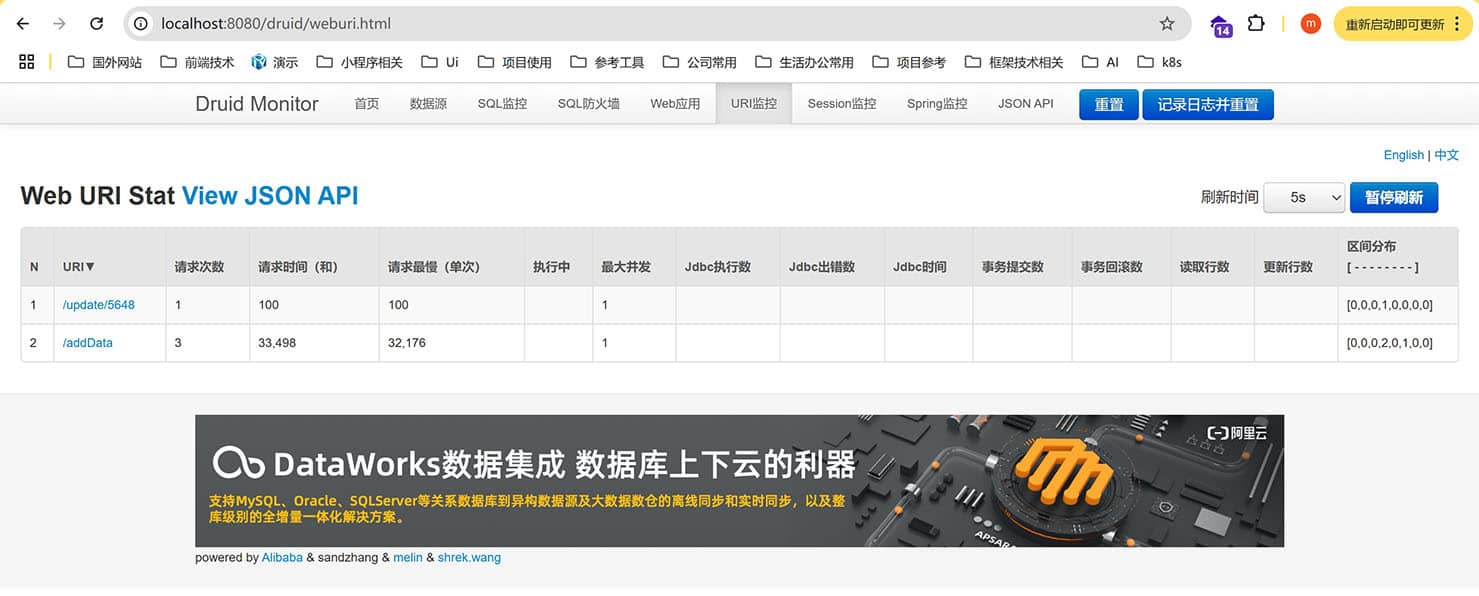
Druid (阿里巴巴) 国内最流行的连接池,功能全面
github文档、阿里云官网 特点:强大的监控功能,防SQL注入,支持分库分表,国内开发者文档丰富 因为Spring Boot 3.x版本开始,迁移到了Jakarta EE 9+,所以主要分两个大版本依赖,支持 springboot 2.x 的 druid 和支持 springboot 3.x 的 druid-spring-boot-3-starter
spring boot 2.x
    <dependency>
      <groupId>com.alibaba</groupId>
      <artifactId>druid</artifactId>
      <version>1.2.23</version>
    </dependency>
spring:
  datasource:
    #  若是出现时区配置错误 可以添加 serverTimezone=UTC
    url: jdbc:mysql://[2409:xxxx:4826:xxxx:80cc:1212:xxxx:xxxx]:3306/blog?useUnicode=true&characterEncoding=utf-8&useSSL=false&serverTimezone=Asia/Shanghai
    username: xxxx
    password: xxxxxxx
    driver-class-name: com.mysql.jdbc.Driver
    type: com.alibaba.druid.pool.DruidDataSource
    druid:
      # 初始化连接池即创建连接,建议保持不变
      init: true
      # 初始化连接池时建立连接的个数,可以根据实际情况调整
      initialSize: 10
      # 连接池中允许的最大连接数量,可以根据实际情况调整,建议和业务线程池大小相同
      maxActive: 200
      # 连接池中维护的空闲连接的数量,可以根据实际情况调整,建议和maxActive的值相同
      minIdle: 200
      # 获取连接最大等待时间,单位毫秒(ms),建议保持不变
      maxWait: 30000

      # 连接保活配置项,建议保持不变,否则可能出现连接断开
      druid.keepAlive: true
      # 连接空闲多久以后,会检查连接的有效性
      druid.keepAliveBetweenTimeMillis: 120000
      # 多久执行一次淘汰连接和保活操作
      timeBetweenEvictionRunsMillis: 60000
      minEvictableIdleTimeMillis: 1800000

      # 连接验证配置项,建议保持不变
      testWhileIdle: true
      testOnBorrow: false
      testOnReturn: false
      # 测试配置连接是否有效
      validation-query: select 'x'
      # 是否在连接处于空闲状态时进行有效性检查。
      test-while-idle: true
      # 从连接池中获取连接时,是否要对连接进行有效性检查。
      test-on-borrow: false
      # 归还连接时,是否要检查连接是否有效。
      test-on-return: false
      # 对预编译语句进行缓存
      pool-prepared-statements: true
      # 连接池中连接的最大连接数
      max-open-prepared-statements: 20
设置配置
package org.example.config;

import com.alibaba.druid.pool.DruidDataSource;
import com.alibaba.druid.support.http.StatViewServlet;
import com.alibaba.druid.support.http.WebStatFilter;
import org.springframework.boot.context.properties.ConfigurationProperties;
import org.springframework.boot.web.servlet.FilterRegistrationBean;
import org.springframework.boot.web.servlet.ServletRegistrationBean;
import org.springframework.context.annotation.Bean;
import org.springframework.context.annotation.Configuration;

import javax.sql.DataSource;
import java.util.HashMap;
import java.util.Map;

@Configuration
public class DruidConfig {

    @Bean
    @ConfigurationProperties(prefix = "spring.datasource.druid")
    public DataSource druidDataSource() {
        return new DruidDataSource();
    }

    @Bean
    public ServletRegistrationBean<StatViewServlet> statViewServlet() {
        ServletRegistrationBean<StatViewServlet> bean = new ServletRegistrationBean<>(new StatViewServlet(), "/druid/*");
        Map<String, String> initParams = new HashMap<>();
        initParams.put("loginUsername", "admin");
        initParams.put("loginPassword", "admin");
        initParams.put("allow", "");
        bean.setInitParameters(initParams);
        return bean;
    }

    @Bean
    public FilterRegistrationBean<WebStatFilter> webStatFilter() {
        FilterRegistrationBean<WebStatFilter> bean = new FilterRegistrationBean<>();
        bean.setFilter(new WebStatFilter());
        Map<String, String> initParams = new HashMap<>();
        initParams.put("exclusions", "*.js,*.css,/druid/*");
        bean.setInitParameters(initParams);
        bean.addUrlPatterns("/*");
        return bean;
    }
}
spring boot 3.x
    <dependency>
      <groupId>com.alibaba</groupId>
      <artifactId>druid-spring-boot-3-starter</artifactId>
    </dependency>
spring:
  datasource:
    type: com.alibaba.druid.pool.DruidDataSource
    druid:
      url: jdbc:mysql://[2409:8a5c:4826:80:xxxx:1212:xxxx:xxxx]:3306/blog?useUnicode=true&characterEncoding=utf-8&useSSL=false&serverTimezone=Asia/Shanghai
      #url=jdbc:mysql://ld-uf6k8yqb741t3****-proxy-sql-lindorm-public.lindorm.rds.aliyuncs.com:33060/database?sslMode=disabled&allowPublicKeyRetrieval=true&useServerPrepStmts=true&useLocalSessionState=true&rewriteBatchedStatements=true&cachePrepStmts=true&prepStmtCacheSize=100&prepStmtCacheSqlLimit=50000000&socketTimeout=120000
      username: xxx
      password: xxxxx
      driver-class-name: com.mysql.cj.jdbc.Driver

      # 初始化连接池即创建连接,建议保持不变
      init: true
      # 初始化连接池时建立连接的个数,可以根据实际情况调整
      initialSize: 10
      # 连接池中允许的最大连接数量,可以根据实际情况调整,建议和业务线程池大小相同
      maxActive: 200
      # 连接池中维护的空闲连接的数量,可以根据实际情况调整,建议和maxActive的值相同
      minIdle: 200
      # 获取连接最大等待时间,单位毫秒(ms),建议保持不变
      maxWait: 30000

      # 连接保活配置项,建议保持不变,否则可能出现连接断开
      druid.keepAlive: true
      # 连接空闲多久以后,会检查连接的有效性
      druid.keepAliveBetweenTimeMillis: 120000
      # 多久执行一次淘汰连接和保活操作
      timeBetweenEvictionRunsMillis: 60000
      minEvictableIdleTimeMillis: 1800000

      # 连接验证配置项,建议保持不变
      testWhileIdle: true
      testOnBorrow: false
      testOnReturn: false
      # 测试配置连接是否有效
      validation-query: select 'x'
      # 是否在连接处于空闲状态时进行有效性检查。
      test-while-idle: true
      # 从连接池中获取连接时,是否要对连接进行有效性检查。
      test-on-borrow: false
      # 归还连接时,是否要检查连接是否有效。
      test-on-return: false
      # 对预编译语句进行缓存
      pool-prepared-statements: true
      # 连接池中连接的最大连接数
      max-open-prepared-statements: 20
      # 监控配置
      stat-view-servlet:
        enabled: true
        url-pattern: /druid/*
设置配置
package org.example.config;

import com.alibaba.druid.pool.DruidDataSource;
import com.alibaba.druid.support.jakarta.StatViewServlet;  // 替换旧的http包
import com.alibaba.druid.support.jakarta.WebStatFilter;    // 替换旧的http包
import org.springframework.boot.context.properties.ConfigurationProperties;
import org.springframework.boot.web.servlet.FilterRegistrationBean;
import org.springframework.boot.web.servlet.ServletRegistrationBean;
import org.springframework.context.annotation.Bean;
import org.springframework.context.annotation.Configuration;
import org.springframework.jdbc.core.JdbcTemplate;

import javax.sql.DataSource;
import java.util.HashMap;
import java.util.Map;

@Configuration
public class DruidConfig {

    @Bean
    @ConfigurationProperties(prefix = "spring.datasource.druid")
    public DataSource druidDataSource() {
        System.out.println(new DruidDataSource());
        return new DruidDataSource();
    }

    @Bean
    public ServletRegistrationBean<StatViewServlet> statViewServlet() {
        // 使用 jakarta.servlet.Servlet 兼容的 StatViewServlet
        ServletRegistrationBean<StatViewServlet> bean = new ServletRegistrationBean<>(new StatViewServlet(), "/druid/*");
        Map<String, String> initParams = new HashMap<>();
        initParams.put("loginUsername", "admin");
        initParams.put("loginPassword", "admin");
        initParams.put("allow", "");
        bean.setInitParameters(initParams);
        return bean;
    }

    @Bean
    public FilterRegistrationBean<WebStatFilter> webStatFilter() {
        FilterRegistrationBean<WebStatFilter> bean = new FilterRegistrationBean<>();
        bean.setFilter(new WebStatFilter());
        Map<String, String> initParams = new HashMap<>();
        initParams.put("exclusions", "*.js,*.css,/druid/*");
        bean.setInitParameters(initParams);
        bean.addUrlPatterns("/*");
        return bean;
    }
}
Tomcat JDBC Pool
Tomcat JDBC Pool Spring Boot 1.x默认连接池
特点:稳定性高,适合传统应用
spring:
  datasource:
    tomcat:
      max-active: 50
      max-idle: 10
      min-idle: 5
c3p0
c3p0 老牌连接池 特点:兼容性好,稳定性高
<dependency>
    <groupId>com.mchange</groupId>
    <artifactId>c3p0</artifactId>
    <version>0.9.5.5</version>
</dependency>
一般来说性能排序:HikariCP > Druid > Tomcat JDBC > c3p0
Springsecurity(安全)
Spring Security 是针对Spring项目的安全框架,也是Spring Boot底层安全模块默认的技术选型,他可以实现强大的Web安全控制,对于安全控制,我们仅需要引入spring-boot-starter-security模块,进行少量的配置,即可实现强大的安全管理!
记住几个类:
- WebSecurityConfigurerAdapter:自定义Security策路
- AuthenticationManagerBuilder:自定义认证策路
- @EnableWebsecurity:开启Websecurity模式
Spring Security的两个主要目标是“认证”和“授权”(访问控制)。 “认证”(Authentication) "授权”(Authorization)
这个概念是通用的,而不是只在Spring Security 中存在
参考官网:https://spring.io/projects/spring-security, 查看我们自己项目中的版本,找到对应的帮助文档:https://docs.spring.io/spring-security/site/docs/5.2.0.RELEASE/reference/htmlsingle/
用户认证和授权
主要是服务端渲染模板方式判断,前后端分离方式由后端数据判断前端处理
//AOP : 拦截器!
@EnableWebSecurity
public class SecurityConfig extends WebSecurityConfigurerAdapter {
    //链式编释
    @Override
    protected void configure(Httpsecurity http)throws Exception {
      //首页所有人可以访问,功能页只有对应有权限的人才能访问//诸求授权的规网~
      http.authorizeRequests()
        .antMatchers("/").permitAll()
        .antMatchers("/level1/*").hasRole("vip1")
        .antMatchers("/leve12/*").hasRole("vip2")
        .antMatchers("/level3/**").hasRole("vip3")

      //没有权限默认会到发录页面
      http.formLogin();

      //注销
      // 防止CSRF攻击
      http.csrf().disable();
      http.logout().logoutSuccessUrl("/");

      // 开启记住我功能
      http.rememberMe().characterEncoding("utf-8").tokenValiditySeconds(60 * 60 * 24);
    }
    }

    //认证,springboot 2.1.x 可以直按使用//余码编码:PasswordEncoder
    //4:spring secutiry 5.e+ 新增了很多的加密方法,
    @Override
    protected void configure(AuthenticationManagerBuilder auth)throws Exception {
      //这些数据正常应该从数据库中谈
      auth.inMemoryAuthentication().passwordEncoder(new BcryptPasswordEncoder())
        .withUser( username: "mn").password(new BCryptPasswordEncoder().encode("123456")).roles("vip2","vip3")
        .withUser( username: "root").password(new BcryptPasswordEncoder().encode("123456")).roles("vip1","vip2","vip3")
        .and()
        .withuser( username: "guest").password(new BcryptPasswordEncoder().encode("123466")).roles("vip1");
    }
}

//  EnableWebSecurity 开启WebSecurity模式
@EnableWebSecurity
public class DirectlyConfiguredJwkSetUri extends WebSecurityConfigurerAdapter {
    protected void configure(HttpSecurity http) {
        http.authorizeRequests()
            .anyRequest().authenticated()
            .and()
            .oauth2ResourceServer().jwt()
            .jwtAuthenticationConverter(grantedAuthoritiesExtractor());
    }
}
在 Security 5.7 后 WebSecurityConfigurerAdapter 被标记为过时,建议直接实现SecurityFilterChain接口。
package com.misstree.demo.config;

import org.springframework.context.annotation.Bean;
import org.springframework.context.annotation.Configuration;
import org.springframework.security.config.annotation.web.builders.HttpSecurity;
import org.springframework.security.web.SecurityFilterChain;

@Configuration
public class SecurityConfig {

    @Bean
    public SecurityFilterChain securityFilterChain(HttpSecurity http) throws Exception {
        http.authorizeHttpRequests((requests) -> requests
                .anyRequest().authenticated()
            )
            .formLogin((form) -> form
                .loginPage("/login")
                .permitAll()
            )
            .logout((logout) -> logout.permitAll());
        return http.build();
    }
}
JWT
JWT(JSON Web Token)是一种用于在各方之间安全传输信息的紧凑、URL安全的方式。它由三部分组成:头部(Header)、载荷(Payload)和签名(Signature)。JWT通常用于身份验证和授权。 在 Java Spring Boot 3 中,除了 JJWT(io.jsonwebtoken)之外,另一个常用的 JWT 库是 java-jwt(com.auth0:java-jwt)。它也是一个功能强大且广泛使用的 JWT 实现库。
JWT 优点
- 无状态:JWT是无状态的,服务器不需要存储会话信息,因此可以轻松扩展。
- 简单:JWT的格式简单,易于解析和验证。
- 安全:JWT使用数字签名来确保数据的完整性和真实性。
- 跨平台:JWT可以在不同的平台和语言之间传递,无需担心兼容性问题。
JWT 缺点
- 安全性:JWT的安全性取决于密钥的保密性,如果密钥泄露,攻击者可以伪造JWT。
- 性能:由于JWT是无状态的,每次请求都需要验证JWT,可能会对服务器性能产生影响。
- 可扩展性:JWT的扩展性不如传统的会话管理方式,如果需要存储额外的信息,可能需要修改JWT的结构。
JWT 使用场景
- 身份验证:JWT可以用于验证用户的身份,并在用户登录后生成一个JWT,用户在后续的请求中携带JWT进行身份验证。
JWT 依赖
<!-- Spring Security -->
<dependency>
    <groupId>org.springframework.boot</groupId>
    <artifactId>spring-boot-starter-security</artifactId>
</dependency>

<!-- JWT 库 -->
<dependency>
    <groupId>io.jsonwebtoken</groupId>
    <artifactId>jjwt-api</artifactId>
    <version>0.11.5</version>
</dependency>
<dependency>
    <groupId>io.jsonwebtoken</groupId>
    <artifactId>jjwt-impl</artifactId>
    <version>0.11.5</version>
    <scope>runtime</scope>
</dependency>
<dependency>
    <groupId>io.jsonwebtoken</groupId>
    <artifactId>jjwt-jackson</artifactId>
    <version>0.11.5</version>
    <scope>runtime</scope>
</dependency>
JWT 代码
配置application.properties
# JWT配置
app.jwtSecret=yourVerySecureSecretKeyThatShouldBeLongAndRandom
app.jwtExpirationInMs=86400000 # 24小时
工具类
import io.jsonwebtoken.*;
import io.jsonwebtoken.security.Keys;
import org.springframework.beans.factory.annotation.Value;
import org.springframework.security.core.Authentication;
import org.springframework.stereotype.Component;

import java.security.Key;
import java.util.Date;

@Component
public class JwtTokenProvider {

    @Value("${app.jwtSecret}")
    private String jwtSecret;

    @Value("${app.jwtExpirationInMs}")
    private int jwtExpirationInMs;

    // 生成密钥
    private Key getSigningKey() {
        byte[] keyBytes = Decoders.BASE64.decode(jwtSecret);
        return Keys.hmacShaKeyFor(keyBytes);
    }

    // 从认证对象生成token
    public String generateToken(Authentication authentication) {
        UserPrincipal userPrincipal = (UserPrincipal) authentication.getPrincipal();

        Date now = new Date();
        Date expiryDate = new Date(now.getTime() + jwtExpirationInMs);

        return Jwts.builder()
                .setSubject(Long.toString(userPrincipal.getId()))
                .setIssuedAt(new Date())
                .setExpiration(expiryDate)
                .signWith(getSigningKey(), SignatureAlgorithm.HS512)
                .compact();
    }

    // 从token中获取用户ID
    public Long getUserIdFromJWT(String token) {
        Claims claims = Jwts.parserBuilder()
                .setSigningKey(getSigningKey())
                .build()
                .parseClaimsJws(token)
                .getBody();

        return Long.parseLong(claims.getSubject());
    }

    // 验证token
    public boolean validateToken(String authToken) {
        try {
            Jwts.parserBuilder().setSigningKey(getSigningKey()).build().parse(authToken);
            return true;
        } catch (MalformedJwtException ex) {
            // 无效的JWT令牌
        } catch (ExpiredJwtException ex) {
            // 过期的JWT令牌
        } catch (UnsupportedJwtException ex) {
            // 不支持的JWT令牌
        } catch (IllegalArgumentException ex) {
            // JWT声明为空
        }
        return false;
    }
}
创建认证过滤器
import org.springframework.security.core.Authentication;
import org.springframework.security.core.context.SecurityContextHolder;
import org.springframework.stereotype.Component;
import org.springframework.web.filter.OncePerRequestFilter;

import javax.servlet.FilterChain;
import javax.servlet.ServletException;
import javax.servlet.http.HttpServletRequest;
import javax.servlet.http.HttpServletResponse;
import java.io.IOException;

@Component
public class JwtAuthenticationFilter extends OncePerRequestFilter {

    private final JwtTokenProvider tokenProvider;

    public JwtAuthenticationFilter(JwtTokenProvider tokenProvider) {
        this.tokenProvider = tokenProvider;
    }

    @Override
    protected void doFilterInternal(HttpServletRequest request, HttpServletResponse response, FilterChain filterChain)
            throws ServletException, IOException {

        try {
            String jwt = getJwtFromRequest(request);

            if (jwt != null && tokenProvider.validateToken(jwt)) {
                Long userId = tokenProvider.getUserIdFromJWT(jwt);

                // 这里可以根据需要加载用户信息
                // Authentication authentication = ...
                // SecurityContextHolder.getContext().setAuthentication(authentication);

                // 简单示例 - 实际应用中应该创建完整的Authentication对象
                SecurityContextHolder.getContext().setAuthentication(
                    new UsernamePasswordAuthenticationToken(userId, null, Collections.emptyList())
                );
            }
        } catch (Exception ex) {
            logger.error("Could not set user authentication in security context", ex);
        }

        filterChain.doFilter(request, response);
    }

    private String getJwtFromRequest(HttpServletRequest request) {
        String bearerToken = request.getHeader("Authorization");
        if (bearerToken != null && bearerToken.startsWith("Bearer ")) {
            return bearerToken.substring(7);
        }
        return null;
    }
}
配置 Spring Security
import org.springframework.context.annotation.Bean;
import org.springframework.context.annotation.Configuration;
import org.springframework.security.authentication.AuthenticationManager;
import org.springframework.security.config.annotation.authentication.builders.AuthenticationManagerBuilder;
import org.springframework.security.config.annotation.method.configuration.EnableGlobalMethodSecurity;
import org.springframework.security.config.annotation.web.builders.HttpSecurity;
import org.springframework.security.config.annotation.web.configuration.EnableWebSecurity;
import org.springframework.security.config.annotation.web.configuration.WebSecurityConfigurerAdapter;
import org.springframework.security.config.http.SessionCreationPolicy;
import org.springframework.security.crypto.bcrypt.BCryptPasswordEncoder;
import org.springframework.security.crypto.password.PasswordEncoder;
import org.springframework.security.web.authentication.UsernamePasswordAuthenticationFilter;

@Configuration
@EnableWebSecurity
@EnableGlobalMethodSecurity(prePostEnabled = true)
public class SecurityConfig extends WebSecurityConfigurerAdapter {

    private final JwtAuthenticationFilter jwtAuthenticationFilter;
    private final UserDetailsService userDetailsService; // 你的UserDetailsService实现

    public SecurityConfig(JwtAuthenticationFilter jwtAuthenticationFilter,
                         UserDetailsService userDetailsService) {
        this.jwtAuthenticationFilter = jwtAuthenticationFilter;
        this.userDetailsService = userDetailsService;
    }

    @Override
    protected void configure(AuthenticationManagerBuilder auth) throws Exception {
        auth.userDetailsService(userDetailsService).passwordEncoder(passwordEncoder());
    }

    @Bean
    @Override
    public AuthenticationManager authenticationManagerBean() throws Exception {
        return super.authenticationManagerBean();
    }

    @Bean
    public PasswordEncoder passwordEncoder() {
        return new BCryptPasswordEncoder();
    }

    @Override
    protected void configure(HttpSecurity http) throws Exception {
        http
            .cors().and().csrf().disable()
            .sessionManagement().sessionCreationPolicy(SessionCreationPolicy.STATELESS).and()
            .authorizeRequests()
                .antMatchers("/api/auth/**").permitAll() // 登录注册等公开接口
                // 放行特定的 POST 请求(如登录/注册)
                .antMatchers(HttpMethod.POST, "/api/auth/**").permitAll()
                // 放行静态资源
                .antMatchers("/static/**", "/swagger-ui/**").permitAll()
                .antMatchers(HttpMethod.GET, "/**").permitAll()// 放行所有 GET 请求
                .anyRequest().authenticated(); // 其他接口需要认证

        // 添加JWT过滤器
        http.addFilterBefore(jwtAuthenticationFilter, UsernamePasswordAuthenticationFilter.class);
    }
}
创建认证控制器
import org.springframework.http.ResponseEntity;
import org.springframework.security.authentication.AuthenticationManager;
import org.springframework.security.authentication.UsernamePasswordAuthenticationToken;
import org.springframework.security.core.Authentication;
import org.springframework.security.core.context.SecurityContextHolder;
import org.springframework.web.bind.annotation.PostMapping;
import org.springframework.web.bind.annotation.RequestBody;
import org.springframework.web.bind.annotation.RequestMapping;
import org.springframework.web.bind.annotation.RestController;

@RestController
@RequestMapping("/api/auth")
public class AuthController {

    private final AuthenticationManager authenticationManager;
    private final JwtTokenProvider tokenProvider;
    private final UserDetailsService userDetailsService; // 你的UserDetailsService实现

    public AuthController(AuthenticationManager authenticationManager,
                          JwtTokenProvider tokenProvider,
                          UserDetailsService userDetailsService) {
        this.authenticationManager = authenticationManager;
        this.tokenProvider = tokenProvider;
        this.userDetailsService = userDetailsService;
    }

    @PostMapping("/login")
    public ResponseEntity<?> authenticateUser(@RequestBody LoginRequest loginRequest) {
        Authentication authentication = authenticationManager.authenticate(
            new UsernamePasswordAuthenticationToken(
                loginRequest.getUsernameOrEmail(),
                loginRequest.getPassword()
            )
        );

        SecurityContextHolder.getContext().setAuthentication(authentication);
        String jwt = tokenProvider.generateToken(authentication);

        // 返回token和其他用户信息
        return ResponseEntity.ok(new JwtAuthenticationResponse(jwt));
    }
}
OAuth
| 特性 | OAuth1.0 | OAuth2.0 |
|---|---|---|
| 签名机制 | 必须签名(HMAC-SHA1) | 依赖HTTPS,移除签名 |
| 令牌格式 | 无明确规范 | 支持Bearer Token(如JWT) |
| 流程灵活性 | 单一流程 | 多种授权流程(授权码、隐式等) |
| 适用场景 | 主要Web应用 | Web、移动端、服务间通信等 |
| 安全性增强 | 较高(但实现复杂) | 更高(HTTPS + 多种防护措施) |
| 扩展性 | 有限 | 支持OIDC、设备授权等扩展 |
在单纯的是前后端分离web应用使用OAuth1.0也可以(但是现在OAuth1.0在逐渐淘汰),在需要第三方应用授权的情况需要使用到 OAuth2.0,如微信登录、QQ登录等。 以下功能必须要用到OAuth2.0:
- 第三方登录:如微信、QQ、微博等第三方平台提供的登录功能。
- 授权码模式(Authorization Code)
- 客户端凭证模式(Client Credentials)
- 令牌交换(Token Exchange)
- OpenID Connect(OIDC)
OAuth2.0 依赖
<!-- Spring Security OAuth2 核心依赖 -->
<dependency>
    <groupId>org.springframework.boot</groupId>
    <artifactId>spring-boot-starter-oauth2-client</artifactId>
</dependency>

<!-- 如果需要资源服务器功能(验证JWT令牌) -->
<dependency>
    <groupId>org.springframework.boot</groupId>
    <artifactId>spring-boot-starter-oauth2-resource-server</artifactId>
</dependency>

<!-- 如果需要授权服务器(颁发JWT) -->
<dependency>
    <groupId>org.springframework.boot</groupId>
    <artifactId>spring-boot-starter-oauth2-authorization-server</artifactId>
</dependency>
@Configuration
@EnableWebSecurity
public class SecurityConfig {

    @Bean
    public SecurityFilterChain securityFilterChain(HttpSecurity http) throws Exception {
        http
            .authorizeRequests(auth -> auth
                .antMatchers("/api/public/**").permitAll()
                .anyRequest().authenticated()
            )
            // JWT认证(自定义过滤器)
            .addFilterBefore(jwtAuthenticationFilter(), UsernamePasswordAuthenticationFilter.class)
            // OAuth2登录
            .oauth2Login(oauth2 -> oauth2
                .loginPage("/login") // 自定义登录页
                .defaultSuccessUrl("/home", true)
            );
        return http.build();
    }

    @Bean
    public JwtAuthenticationFilter jwtAuthenticationFilter() {
        return new JwtAuthenticationFilter(jwtTokenProvider);
    }
}